Tag Archives: Tone Tips

How Pickup Height Affects the Tone (Updated Feb 2012)

Is the bridge pickup of your Telecaster too bright? Or do the two Humbuckers in your Gibson seem to have very different output volumes? These two common situations prompt a lot of G.A.S. stricken guitarists to purchase new pickups or modify their electronics.

But did you know that the distance between a pickup and the strings, also known as pickup height, can be setup easily on most guitars and can alleviate a lot of these problems?

As a general rule, when you move a pickup closer to the strings, you will get more output but also more high frequencies which can become ear piercing. At some extreme settings you might loose some sustain as the magnet(s) contained in your pickup(s) will “slow down” the vibrations of the string.

On the other hand, when you move a pickup further away from the strings, you will loose some of those ear piercing frequencies but get a lower output volume.

Sound Example

Here is an example featuring the bridge pickup of my 1978 Telecaster:
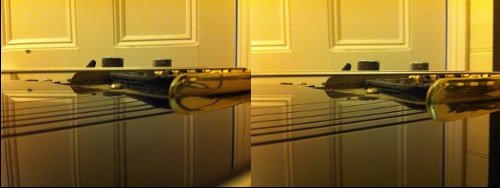
Bridge Pickup of a Telecaster - Left: High Pickup Height, Right: Lower Pickup Height

I have kept the exact same amp settings and have recorded similar clean licks with my Telecaster bridge pickup set very high:

Audio MP3

and then lower:

Audio MP3

Notice the difference in output volume and high end frequencies.

How to Change the Pickup Height on your Guitar

I will detail here how to change the height of the pickups on Telecasters, Stratocasters and Gibson style guitars. Note that it might be different for other brands, models or eras! Usually, manufacturers will issue precise guidelines as to what the optimal pickup height should be for a particular model. Personally, I prefer to do it by ear as I need to hear the changes through my effect/amp setup.

A last word of advice: in general, when you start turning screws to set up anything on a guitar (truss rod, tremolo system, pickup height, etc.), start by quarter turns, not full turns. Be gentle! In the case of pickup height, a quarter turn might be enough to reach the sweet spot you are looking for. To give you an example, with the bridge pickup of my Telecaster, I almost cover the full spectrum in about two full turns.

Adjusting Pickup Height on a Telecaster

On my 1978 Telecaster, I cannot find any visible screws to adjust the neck pickup height but the bridge pickup offers no less than three screws (see image below). No wonder as this pickup can be too bright and often needs a bit of adjustment. By loosening (anti clock wise) the screws, the pickup goes down while tightening them (clock wise) brings it closer to the strings. By playing with these three screws, you can have the pickup higher for the lower strings but lower for the higher strings. You can also have it at an angle. Remember the general rule, the closer to the strings the more volume and high end. Mine had to be lowered a bit as I found it a tad too bright for clean work and a bit too rich in “ear piercing” harmonics. Update Feb 2012: refer to the  Telecaster setup guide for official guidelines.
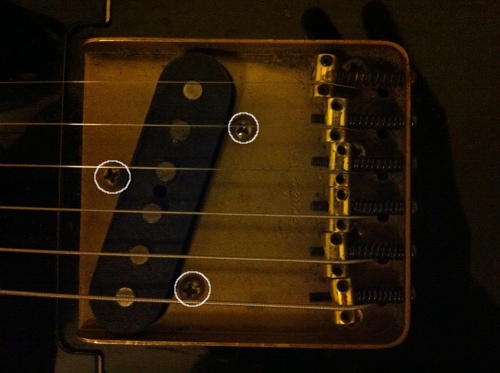
Fender Telecaster - Position of the Pickup Height Adjustment Screws


Adjusting Pickup Height on a Stratocaster

My 1997 Fender American Classics Custom Shop Stratocaster is fitted with Kinman noiseless pickups. Chris Kinman has a great pickup height adjustment guide on his website, make sure to check it out.

Anyway, these pickups produce very different results depending on their height so getting it right for your taste and gear is paramount. Luckily, it is really easy on a Strat as each pickup has two screws (see image below). Loosen them to lower the pickup or tighten them to bring it closer to the strings. Update Feb 2012: refer to the Stratocaster setup guide for official guidelines.
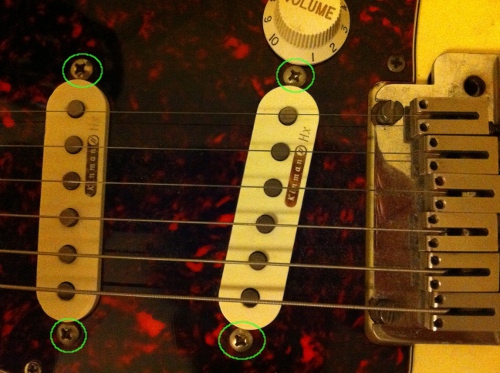
Fender Stratocaster - Position of the Pickup Height Adjustment Screws
Adjusting Pickup Height on a Gibson Style Guitar (here, a 61 Reissue SG)

Gibson guitars are much like Strats with two screws per pickup (see image below): loosening the screws lowers the pickup while tightening them brings it closer to the strings. Update Feb 2012: refer to this Gibson.com post for official guidelines.
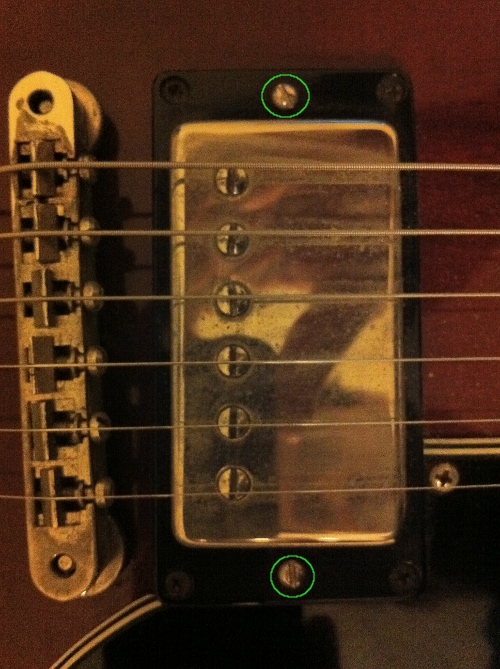
Gibson SG - Position of the Pickup Height Adjustment Screws


Building a complex guitar rig

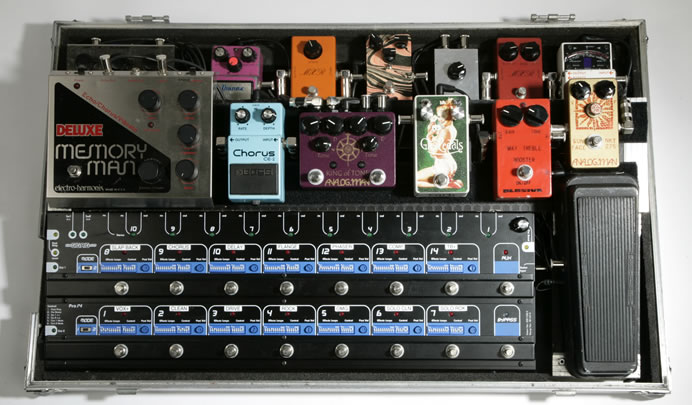
With the ever growing number of pedals in our rigs, issues often arise such as tap dancing to switch between different sounds, powering all our beloved stompboxes as well as the introduction of noise or hum in the tone. I recently stumbled upon the website of The Gig Rig and from what I can see, this is a company that probably addresses every issue associated with building a complex guitar rig. It prompted me to write a post about organizing and powering our pedals.

The Gig Rig products help you organize and power all your pedals - Picture courtesy of The Gig Rig
Switching

In order to turn multiple pedals on and off, The Gig Rig offers a number of programmable “Loop Switcher” floorboards.

The idea is quite simple, these machines have a number of effect loops in which you insert your effect units or pedals. They work like the effect loop on your amp except that on the Gig Rig loop switchers, you can have up to 10 of them. And even better, you can program presets such as “pedal in effect loop 1 + pedal in effect loop 3” and recall these presets by pressing a switch. In other words, it turns a bunch of pedals into a programmable multi-effect unit.

Here is a video demo of the Gig Rig flagship Pro 14 loop switcher which offers no less that 10 loops and 14 presets:

The Pro 14 comes with a power supply to power all these pedals and has some neat features such as the possibility to correct volume mismatches between pedals, the possibility to choose between buffered or true bypass signal paths or two outputs if you use two amplifiers.

The Gig Rig offers another 3 loop switchers:

  • the Midi 8 which is a 6 loops/10 preset version of the Pro 14 minus the true bypass/buffered signal paths feature
  • the Loopy-2 is a simple 2 loop non programmable switcher (same idea as the Boss LS-2 without the volume control)
  • The Remote Loopy-2 is the same as the Loopy-2 except that the switch can be “deported” so that you can leave the switcher near the effect loop of your amp

Alternatives: other companies make loop switchers, check out the Combinator and the Octa Switch from Carl Martin or the Commander and GCX Ground Control Pro/Audio Switcher from Voodoo Lab.

Powering your pedals and getting rid of the hum

Often, a poor choice of wall wart adapters to power your pedals can significantly alter the quality of your tone. Granted this is not the only reason for getting hum but it is an easily fixable one.

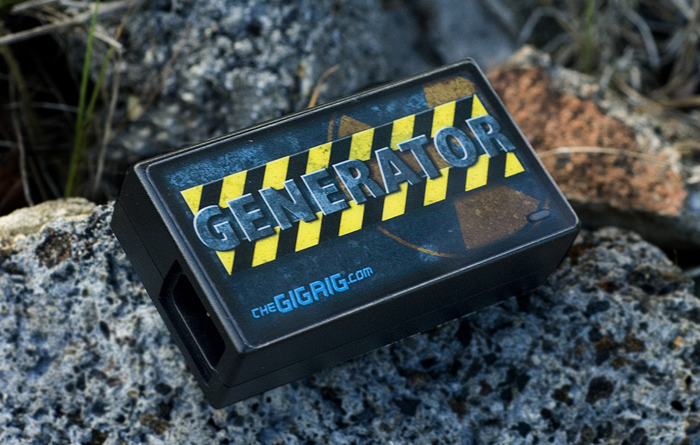
Although it is not a novel idea, The Gig Rig has refined the idea of a power supply capable of powering many pedals. The Generator in itself is a power supply that provides up to 5A of power which is more than enough to power all your pedals. It comes with daisy chain Boss style cables.

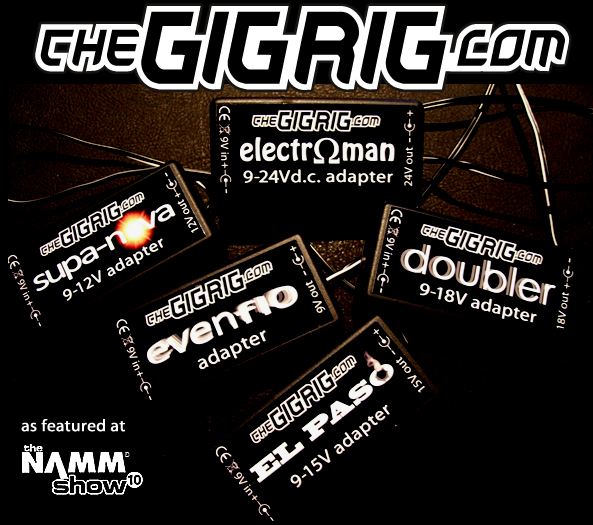
That would be pretty boring without the available isolated adapters which allows to power any type of pedal on the planet such as 12V (TC Electronic Nova Delay), 15V, 18V or even 24V.

The Generator power supply...

...And its adapters

Even better, the Virtual Battery adapter will make your pedals believe they are powered by a battery. Perfect to power a vintage pedal!

Finally, for those of you with ground problems, the Hum Dinger provides an isolated output.

The Gig Rig website is full of advice and information about pedals and building rigs, it is well worth a read.

Alternatives: when looking for a pedal power supply,  companies to consider include CIOKS (I personnally own a Big John which can power up to seven 9V pedals and it has been very good) and Voodoo Lab with their famous Pedal Power line of products.

How to use a Delay, Part 1

The delay is a favorite effect of mine. I remember the first time I tried one, I thought I was David Gilmour for a minute.  It is probably one of the most useful effects out there. It offers a world of possibilities but it usually requires some practice to master. I will explore the main uses of a delay in a series of posts. Part 1 is dedicated to the creation of rhythmic patterns using a delay and we will see how to recreate the basic “U2” delay effect. Later, in Part 2, we will focus on the ability of this fabulous effect to fatten your tone and discuss the differences between analog and digital delays.

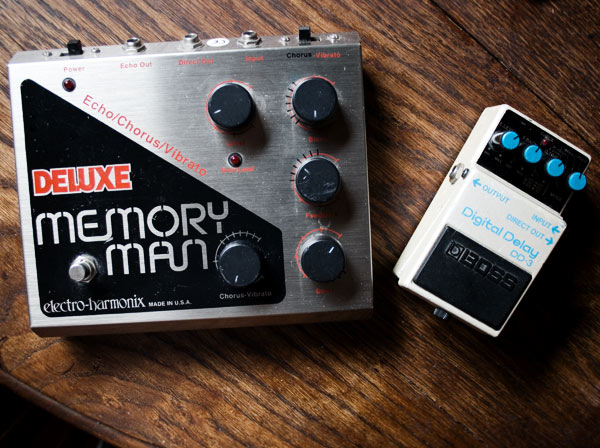
The Electro Harmonix Deluxe Memory Man Analog Delay and the BOSS DD-3 Digital Delay, two very popular models
The Basics

What a delay does is repeat the notes you are playing on your guitar once or several times, each repetition being usually softer than the previous one. You encounter a similar effect in nature when shouting in a valley or a cave. The time between the repetitions can be chosen through a “delay time” setting on most units. It is usually labelled in milliseconds and ranges from a few milliseconds to several seconds for the most sophisticated models. The number of repetitions is usually defined by a “feedback” setting. Most units also offer a “level” or “mix” control which determines the amount of dry signal versus the delayed signal. Often, delays are also called echos. There is a difference though: delays can have an infinite number of repetitions whereas echos have a limited number.

To clarify, a delay unit should at least offer three settings: delay time, feedback and mix/level. More recently, delays have been incorporating many other settings which I mention further down.

Delay Time and Tempo

You will often read or hear that the delay time should be set according to the tempo of the song you are playing. I don’t think this is always true. If you are using the delay to obtain a rhythmical effect (think The Edge from U2 or Pink Floyd’s “Run like Hell”), then yes the delay time should follow the tempo of the song. But if you are using the delay to fatten your tone (as we will see in Part 2), I don’t think following the tempo of the song is so important.

Using the delay for rhythmical effects: the infamous dotted eighth

The Edge, U2’s guitarist, has made the use of rhythmical delay effects his trademark. In the beginning of  his career in the early 80s, he was already using a delay to make out as if he was playing more notes than he was actually playing. The trick was that the notes “played” by the delay were in sync with the tempo of the song which gave U2’s songs an amazing “pulsation”.

At the time, he was only using analog delays which means the settings had to be done “by ear” and that is not that easy. It also meant that the drummer had to play in sync with the delay. This led The Edge and U2 to drop the delay on their second album (“War”). It was of course back in full force on the subsequent albums on songs like Pride or Where The Streets Have No Name, probably helped by the arrival of digital technologies.

It is easier nowadays to get the same kind of effect using a digital delay unit or a software plugin which allows you to set the delay time to the millisecond. The basic “U2 delay effect” is obtained by setting the delay time to a “dotted eighth”. The feedback should be set so that you have about three or four repetitions and the level/mix quite high, at about 50%. Then, all you have to actually play are eighth notes, the delay will do the rest (see the audio examples below). Note that a dotted eighth is equivalent to 3/16th of a note.

Here is the formula to calculate the delay time so that it falls on a dotted eighth:

delay time in ms = (240000/tempo)x3/16.

Let’s take an example. At a tempo of 120 BPM, divide 240000/120, you get 2000. Multiply 2000 by three and divide by 16 and you get 375ms.

Here is an audio example at a tempo of 120BPM, WITHOUT any delay first:

Audio MP3

Then the exact same thing augmented by a delay set at 375ms, 3 or 4 repetitions and mix at 50% (I have used the delay integrated into my Boss MICRO-BR recorder with the feedback at 13):

Audio MP3

Pretty cool!

Some pedals spare you the cumbersome calculations and allow you to actually do this while playing alongside a drummer in real time, and without any prior knowledge of the tempo. They do so thanks to two extra features that most delay pedals don’t have: a “tap tempo” function and a setting that allows you to choose the delay time based on a “musical” subdivision (dotted 8th for instance). The Tap Tempo allows you to “tap” a pedal in time to set the value of the delay time “on the fly”.  So on these particular models, you can select “dotted 8th” and tap alongside your drummer and voilà, the delay should automagically be in time.

These models include the BOSS DD-20 Digital delay, the Line 6 Echo Park,the TC Electronic Nova Repeater or the super duper boutique high end Providence CHRONO DLY-4. A lot of pedals have got a Tap Tempo feature nowadays but not that many have the ability to select a “musical” subdivision. A note to BOSS DD-7 users: there are a few musical subdivisions (including dotted eighth) that can be selected using the mode selector, check out the manual.

Finally, know that the dotted 8th is not the only interesting subdivision, it is just one that has been used time and again on numerous hits. As always, feel free to experiment! There are two really cool websites you might want to check out if you are into using delays for rhythmical effects: this one by Tim Darling which deals with everything “The Edge” and this one by David Battino which is more generic.

In Part 2 of this series of posts, we will see how we can sound like a guitar hero by fattening our tone using a delay. Stay tuned!

Using two overdrive pedals simultaneously

Combining two overdrive pedals is a topic that pops up often in guitar forums. I suppose the fact that Stevie Ray Vaughan used that kind of configuration at some stage in his career has a lot to do with it. I did quite some experimentation over the years in that “field”, and I thought I should share with you what I have learned.

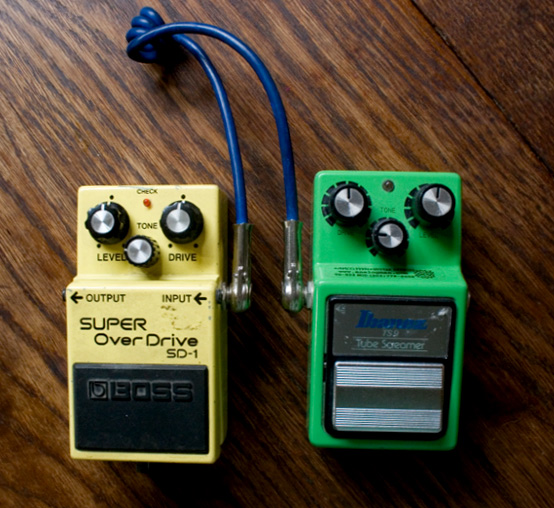
Boss SD-1 and Analogman modded TS9

I will write here about combining two overdrive pedals and I will leave distortion and fuzz pedals for future posts. As I show in a video below, you can get interesting tones out of two overdrive pedals. Why not use just one pedal but with more gain, you might ask? Well, the answer is that two overdrive pedals don’t sound like one pedal with more gain. In addition, it gives you more tonal options since you can switch one of the two pedals on, or the two together. That makes four different tones in total if you count the clean tone.

But you have to know that some combinations work and some don’t. It is hard to predict how two overdrive pedals will interact. By not working, I mean that it might sound overly squashed or very fizzy. Getting the right settings is also very important. I find that when you use two overdrive pedals together, it is rarely a good idea to have one (or the two) with the gain maxed out. Try with lower values first.

I have recorded a video showing how my Analogman modded Ibanez TS9 plays with a stock Boss SD-1. Both pedals have the drive and level at 12 o’clock. The tone is at 9 o’clock since my Fender Champ amplifier is quite bright. The SD-1 is placed after the TS9.

The resulting tone is quite tight and focused with a good sustain. “Focused” is the important word here, this is where two overdrive pedals put together differ from one higher gain pedal.

Here is a video where I show my clean tone first, then I switch the TS9 on, and then both pedals:

The amplifier was miked with a Rode NT-4 and recorded using a Boss Micro-BR. The recording was then transferred into Cubase 5 to optimize the volume and add a hint of reverb. The guitar used is a Fender American Classics Custom Shop Stratocaster fitted with Kinman AVn blues pickups.

Related Posts with Thumbnails