Category Archives: Guitar Tone

All about Guitar Tone!

Digitech Bad Monkey Overdrive: Cheap but not Cheap Sounding

I have featured a number of expensive and less expensive Tube Screamer alternatives over the past year and I thought the Bad Monkey’s turn was long overdue.

It is not really a secret: the Digitech Bad Monkey is an excellent overdrive used by a number of pros, check out Phil X’s videos and you will hear it in action quite often.

As always, I have recorded two videos showing the Bad Monkey in action (see below). They will show how you the beast fares with Single Coil pickups as well as Humbuckers, acting as main overdrive against a clean amp, or as a boost against a distortion pedal.

Introduction

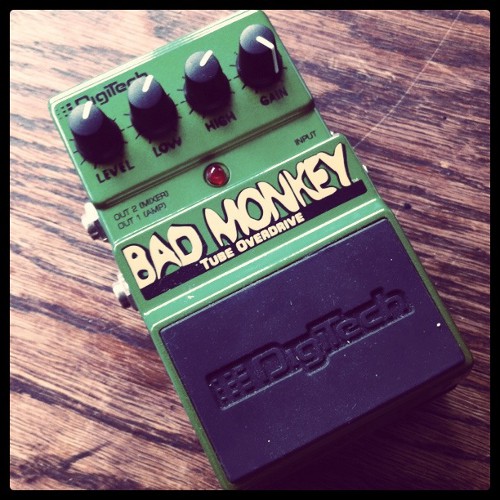
But before watching the videos, let’s introduce the Bad Monkey. It is a green pedal featuring one input and two outputs. It is not stereo though: one output features the unfiltered sound of the overdrive while the second one features an emulated speaker cabinet output so that you can plug the pedal directly into a mixing desk or a sound interface. It is actually a common feature on Digitech pedals and you can hear a quick demo of the MIXER output after the videos, at the end of this post.

Clearly inspired by the Ibanez Tube Screamer in terms of overall tone, the Bad Monkey features a Gain and a Level setting. But it also features something that most overdrive or distortion pedals desperately need: a 2-band EQ. Instead of the measly Tone control often found on other pedals, the Bad Monkey allows you to tune the Bass and the Treble frequency of your tone. This is a big plus and the only overdrive pedals to feature an effective EQ (that I know of) are the Xotic models such as the BB Preamp.

Videos

For this first video, I have used my Stratocaster. This shows how the Bad Monkey sounds against my reference overdrive, an Analogman modded TS9. After comparing the two pedals, I show how the 2-Band EQ can give some “body” to the tone. I found the bass control surprisingly effective with my little Fender Champ which only has an 8″ speaker. At the end of the video, I show how the Bad Monkey can be effectively used to boost a distortion pedal, a good old Pro Co RAT 2:

In this second video, I have used my Gibson SG 61 Reissue, equipped with the stock Classic 57 Pickups. Again, the Analogman TS9 was used as a reference:

Note that for these two videos, I had a Boss RV-3 plugged after the overdrive pedals. It was set on a short Room Reverb (mode Room 2). The amp was my trusty 74 Fender Champ miked by a RODE NT-4.

Direct use

I could not resist and tried the Bad Monkey directly plugged into my Boss Micro-BR.

Here is the reference tone of Strat plugged directly into the “line” input (not the guitar input):

Audio MP3

And now, here is the Bad Monkey with its normal output plugged into the line input of the Micro-BR:

Audio MP3

Pretty bad!! That is what you get when you plug a distortion/overdrive directly into a board.

And now, here is how the MIXER output of the Bad Monkey sounds like (the settings were Gain on Full, Bass and Treble at 2, Level at 1o’clock):

Audio MP3

It is actually not bad at all, I was pretty surprised in a sense that it is usable although a bit dark sounding, but it is definitely not just a gadget. It sounds quite good with the gain on minimum as well, it gets you a usable Jazz/Blues type of tone.

Conclusion

The Digitech Bad Monkey is a great alternative to a Tube Screamer. Actually, more than an alternative, I think it can complement a Tube Screamer really well. I don’t think it sounds quite as smooth as my Analogman TS9 but the 2-Band EQ and the Mixer output makes it really versatile. It is also excellent used as a booster. The best thing is its price, just check it out!

The Boss RV-3 Delay Reverb

As a follow up to two posts I wrote about the Reverb effect (see here and here), I thought that a demo of my good old Boss RV-3 was in order.

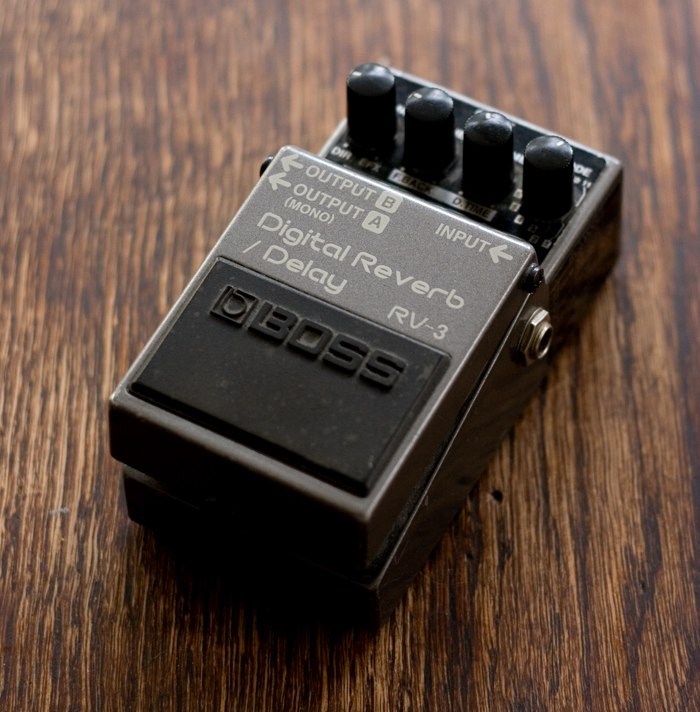
Boss RV-3 Digital Reverb / Delay - Photo Pia Jane Bijkerk

At some stage, you could spot the Boss RV-3 in the pedalboards of acts such as Mike Eizinger (Incubus) or Johnny Greenwood (Radiohead). Made between 1994 and 2002, the RV-3 is quite unique as it combines a digital delay unit and a digital reverb unit. I have included the detailed specs at the end of this post for more information on the different modes.

But before diving into the details, let’s hear it in action. I have recorded this video which shows my favorite settings followed by a demo of each of the 11 modes of the RV-3:


My thoughts on the RV-3

The Boss RV-3 is a product of the mid 90s. It doesn’t feature any analog delay or spring reverb simulations, this is a pure digital beast. Delays are crystal clear and reverbs are precise (some would say “metallic”).

That said, I find that its unique capability (for a compact pedal) to combine delays and reverb provides big “studio quality” guitar tones which can be reminiscent of Jeff Beck’s studio sound on his recent albums. It can also go into total spacious ambient territory and can be used with two amps for a stereo setup as it features one input and two outputs.

For all this, the RV-3 is quite underrated and is a great catch on the second hand market, watch out for one. The RV-5, which replaces the RV-3 in the Boss line up, features a spring reverb simulation on top of the digital kinds but does not have the delays of the RV-3. As such, I find hard to compare the two.

Detailed specs

The RV-3 has no less than 11 selectable modes. One knob selects the mode and the other 3 knobs have different functions depending on the chosen mode. In reverb mode, they affect the parameters of the Reverb: tone, time and level. In delay and delay+reverb mode, they affect the feedback (number of repetitions), delay time (time between the repetitions) and the effect level. Note that in delay+reverb mode, you cannot choose the amount of delay and reverb separately, the unique level knob will allow you to blend more or less delay and reverb, put together.

The modes are as follows:

4 Reverbs:

  • Plate reverb simulation: Hendrix and other late 60s acts were fond of plate reverbs to magnify their tones in the studio. This is quite a big sounding reverb
  • Hall: big digital reverb simulating the space of a rather large enclosed space
  • Room 2: a medium-short room reverb which can be used a bit like a spring reverb, knowing that the RV-3 has no spring reverb simulation
  • Room 1: a short reverb to add just that little bit of ambiance

4 Delay + Reverb modes:

  • Delay + Plate Reverb
  • Delay + Hall reverb
  • Delay + Room 2
  • Delay + Room 1

3 “pure” delay modes:

  • Short: 32ms – 125ms (great for slapback echo)
  • Medium: 125ms – 500ms
  • Long: 32ms – 1000ms

I have demonstrated all these modes in the video above, enjoy!

How Pickup Height Affects the Tone (Updated Feb 2012)

Is the bridge pickup of your Telecaster too bright? Or do the two Humbuckers in your Gibson seem to have very different output volumes? These two common situations prompt a lot of G.A.S. stricken guitarists to purchase new pickups or modify their electronics.

But did you know that the distance between a pickup and the strings, also known as pickup height, can be setup easily on most guitars and can alleviate a lot of these problems?

As a general rule, when you move a pickup closer to the strings, you will get more output but also more high frequencies which can become ear piercing. At some extreme settings you might loose some sustain as the magnet(s) contained in your pickup(s) will “slow down” the vibrations of the string.

On the other hand, when you move a pickup further away from the strings, you will loose some of those ear piercing frequencies but get a lower output volume.

Sound Example

Here is an example featuring the bridge pickup of my 1978 Telecaster:

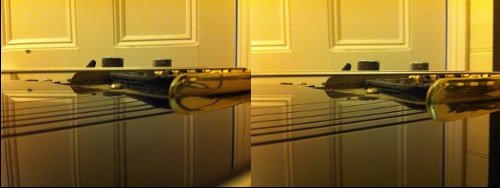
Bridge Pickup of a Telecaster - Left: High Pickup Height, Right: Lower Pickup Height

I have kept the exact same amp settings and have recorded similar clean licks with my Telecaster bridge pickup set very high:

Audio MP3

and then lower:

Audio MP3

Notice the difference in output volume and high end frequencies.

How to Change the Pickup Height on your Guitar

I will detail here how to change the height of the pickups on Telecasters, Stratocasters and Gibson style guitars. Note that it might be different for other brands, models or eras! Usually, manufacturers will issue precise guidelines as to what the optimal pickup height should be for a particular model. Personally, I prefer to do it by ear as I need to hear the changes through my effect/amp setup.

A last word of advice: in general, when you start turning screws to set up anything on a guitar (truss rod, tremolo system, pickup height, etc.), start by quarter turns, not full turns. Be gentle! In the case of pickup height, a quarter turn might be enough to reach the sweet spot you are looking for. To give you an example, with the bridge pickup of my Telecaster, I almost cover the full spectrum in about two full turns.

Adjusting Pickup Height on a Telecaster

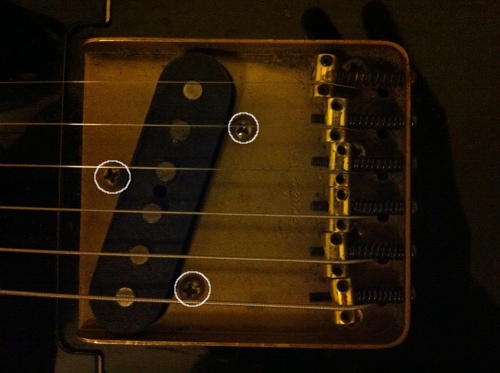
On my 1978 Telecaster, I cannot find any visible screws to adjust the neck pickup height but the bridge pickup offers no less than three screws (see image below). No wonder as this pickup can be too bright and often needs a bit of adjustment. By loosening (anti clock wise) the screws, the pickup goes down while tightening them (clock wise) brings it closer to the strings. By playing with these three screws, you can have the pickup higher for the lower strings but lower for the higher strings. You can also have it at an angle. Remember the general rule, the closer to the strings the more volume and high end. Mine had to be lowered a bit as I found it a tad too bright for clean work and a bit too rich in “ear piercing” harmonics. Update Feb 2012: refer to the  Telecaster setup guide for official guidelines.

Fender Telecaster - Position of the Pickup Height Adjustment Screws


Adjusting Pickup Height on a Stratocaster

My 1997 Fender American Classics Custom Shop Stratocaster is fitted with Kinman noiseless pickups. Chris Kinman has a great pickup height adjustment guide on his website, make sure to check it out.

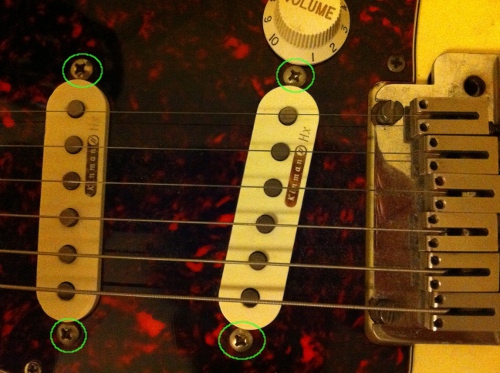
Anyway, these pickups produce very different results depending on their height so getting it right for your taste and gear is paramount. Luckily, it is really easy on a Strat as each pickup has two screws (see image below). Loosen them to lower the pickup or tighten them to bring it closer to the strings. Update Feb 2012: refer to the Stratocaster setup guide for official guidelines.

Fender Stratocaster - Position of the Pickup Height Adjustment Screws
Adjusting Pickup Height on a Gibson Style Guitar (here, a 61 Reissue SG)

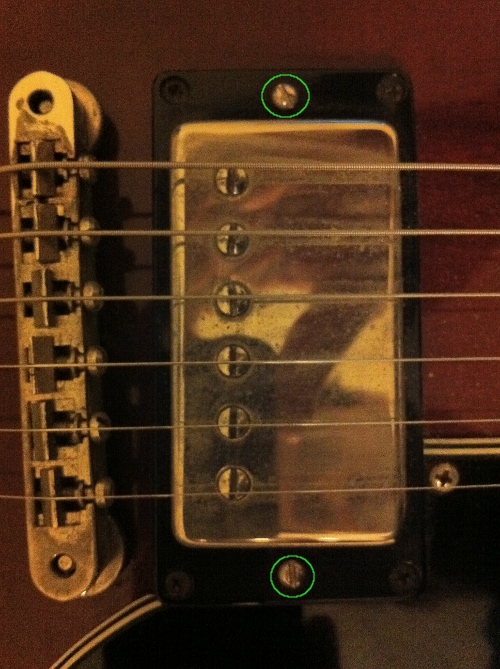
Gibson guitars are much like Strats with two screws per pickup (see image below): loosening the screws lowers the pickup while tightening them brings it closer to the strings. Update Feb 2012: refer to this Gibson.com post for official guidelines.

Gibson SG - Position of the Pickup Height Adjustment Screws


Soundblox Guitar Envelope Filter

I covered last year the release of the Soundblox Pro Classic Distortion pedal, an innovative modeling unit which can reproduce the tone of many legendary overdrive and distortion pedals.

Source Audio did it again, this time turning its attention towards envelope filters. The Soundblox Guitar Envelope Filter does all the clean 70s funky tones you would expect from an envelope filter but it is capable of much more. I especially love the way it can fatten a distorted tone, much like a good phaser can. The filter “action” can be controlled “manually” using the Hot Hand ring. If you don’t know what I am talking about, I suggest you watch this video showing the Soundblox Guitar Envelope Filter in action:

http://youtu.be/jPOGYLV9pY0

Note that there is a bass version of the Soundblox Guitar Envelope Filter.


Related Posts with Thumbnails