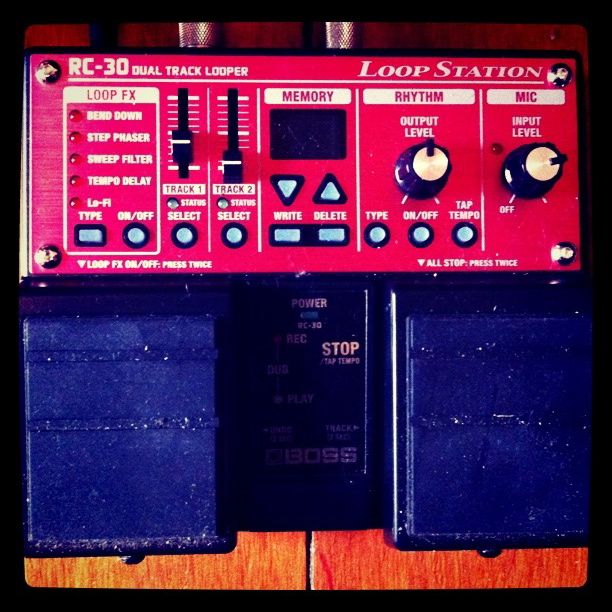
I had wanted a looper for a while so when my girlfriend took me on a tour of Sydney’s guitar stores to pick my own birthday gift, I thought the brand new Boss RC-30 fit the bill nicely. Here is a review featuring the obligatory video demos of this great little machine.
Housed in the same red twin pedal case at its predecessor the RC-20, the RC-30 improves in most areas:
- Longer recording time, 3h in total (it was apparently about 15 min on the RC-20)
- USB port to copy loops in as well as out of the RC-30 (in 16 bit, 44.1 kHz Wave format)
- 99 memory presets to store your loops and recall them at will
- Two independent recording tracks boasting each its own volume slider
- Effects: those are not “traditional” effects such as reverb and delays but are more “crazy DJ” types of effects such as step phaser, lo-fi or tempo delay. My favorite is “Bend Down” which is a bit of a mad whammy all the way down effect. It is featured in several of the videos accompanying this post
Note that Boss also offers the RC-3, a single switch compact pedal looper which does not have all the bells and whistles of the RC-30 (one track, no effects, no XLR input) but keeps the 99 memory phrases and the USB port.
Footwork
The most basic use of the RC-30 is as follows:
- Place it at the end of your effect chain or in the loop of your amp. You could of course place it in the middle of your effect chain but the effects placed after will then not be part of the recordings.
- Hit the left pedal once to start recording
- Hit the left pedal again to stop recording
At this stage the RC-30 plays your recording in a loop and is placed in overdub mode which means anything you play will be recorded on top on that first recording. The number of layers is only limited by the memory (3h total!).
To get out of overdub mode, you have to press the left pedal again. What you have recorded so far will keep on looping so that you can play on top of it but nothing will be recorded anymore.
If you want to go past this basic ‘looper’ use, you’ll have to know that each footswitch has three functions depending on wether you press it once, twice rapidly or hold it for 2 seconds. The RC-30 can be complimented by an external FS-5U or FS-6U footswitch. In the latter case, the two extra switches give you another 6 functions. So that’s a total of twelve!
The built-in footswitches cover the basics: recording, overdubbing, activation of effects, playing, stopping. The FS-6U facilitates some of those but its purchase is in my opinion justified by its ability to go up or down the 99 memory phrases. You can store say a verse and a chorus in two of the 99 memory phrases and go from one to the other by holding each of the footswitches of the FS-6U. I was a bit disappointed this functionnality was not available on the RC-30 itself.
Here is a video where I try to show a bit of the RC-30 “footwork” (I had not owned the machine for long at this stage and you can see I get a bit confused by all those switches towards the end):
Tempo and built-in rythm guide
When you use the “basic” looping mode, the beginning and the end of your first loop are determined by when you press the recording switch. In this case, the “tempo” is defined by the length of the loop.
You can decide instead to use one of the integrated “rhythm guides” which are basic drum patterns. There are only 10 to choose from so it is definitely not a full fledge drum machine, think of it more as a metronome. When the rythm guide is activated, the looping will follow its tempo. The right pedal of the RC-30 can be used to “tap” the tempo as I show in my first video.
Heaps of fun
If you don’t already have a looper, let me tell you, it is a lot of fun. It is a great tool for practicing your timing and improvisation, just record a bunch of chords and play over them. It is also a great songwriting tool as you don’t always need to fire up your super duper complicated recording software to work on some ideas. Finally, it can be a great gigging partner.
It’s hard to fault the RC-30, the audio quality is definitely top notch and it is very responsive. It is more complicated to use than a 3 knob distortion pedal but it is also a lot more sophisticated. The footwork does take some time to get used to but it is worth it in the end. Last piece of advice, don’t hesitate to read the manual, it will get you up to speed quicker than by just experimenting.
To conclude, here are another two videos, the first one is a grungy improv on a famous set of chords…
…and the second one is more atmospheric:
(UPDATED: this is a new version of this video with a less muffled overall sound)
The chain used for the videos was: 1978 Telecaster (stock pickups) -> Morley Pro Wah -> Analogman TS9 -> Pro Co RAT 2 -> Boss LS-2 used as clean boost -> Boss CH-1 -> TC Electronic Flashback Delay -> Marshall JMP-1 set very clean with a Monte Allum modded Boss CS-3 compressor in the FX loop -> straight into a Boss Micro-BR recorder. I have used some of the recorder’s reverb.


